Beaded Mermaid Necklace

Recently, I have noticed that my eyes are naturally drawn to things that are “unicorn” or “mermaid” inspired. The reason for this may be due to the bright colors, or the sparkle associated with each term. Someone I know mentioned how we, as human beings, are drawn to sparkly things because water “sparkles,” and water is an essential part of life.
CONCLUSION: sparkle is life.

To gauge this thirst, I decided to focus on the mermaid aspect of myself.

We will get to unicorns later- don’t you worry.

Did I mention the website Etsy.com? I find myself drawn to the crafting aspect of each individual artist. This weeks inspiration comes from the shop, BellaAnelaJewelry for her gold mermaid necklaces.

mermaid necklace.PNG

  Listing for necklace is found HERE

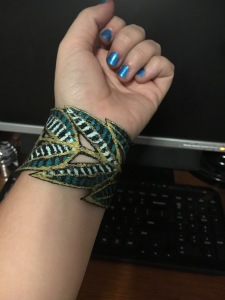
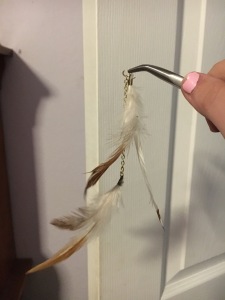
TWIDDLE TEST ~ BEADED MERMAID NECKLACE

Now, Angela, the creator of the above necklace, uses gold, various gemstones, glitter, metallic flakes, and sterling silver for her work. It is therefore much more expensive as it takes nicer materials to produce. For this recreation, we will use junk easy-to-find material, such as gauge wire.

You will need:

  • 16 gauge wire
  • 26 gauge wire
  • Wire pliers & cutter
  • Seed beads of your choice
  • 1 pearl bead or starfish looking charm (optional)

Let’s Dive Right In!

IMG_5070

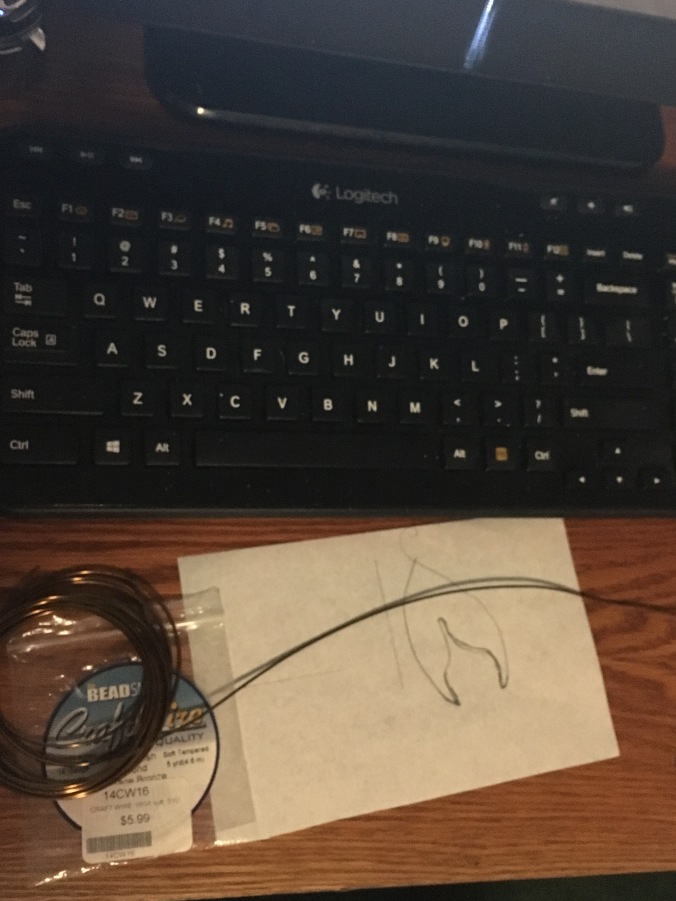
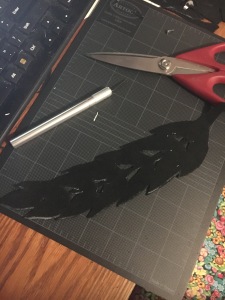
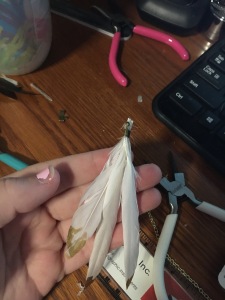
1. Create a mermaid fin drawing on a piece of paper (should be around 2 inches tall).

IMG_5071

2. Use 16 gauge wire (about a 9 inch piece) and shape it around your drawing.

IMG_5072

3. Keep forming the fin (I find using wire pliers will help with sharp curves).

IMG_5073

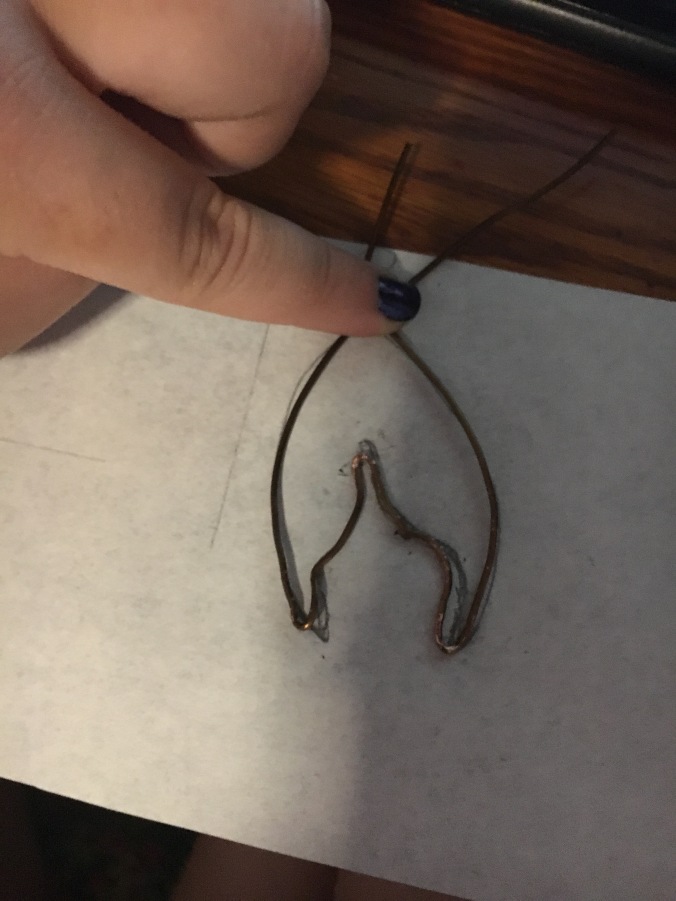
4. Close enough! Tie the extra wire around the top to secure it in place.

IMG_5075

5. You will have a bit of wire left at the top to twist into a clasp at the end. Go ahead and start beading on the seed beads using the 26 gauge wire.

IMG_5077

6. Wrap the wire 3 times around each time you reach a side. I started stringing beads one “row” at a time until I reached the bottom “fins.” Then I did each side individually.

IMG_5080

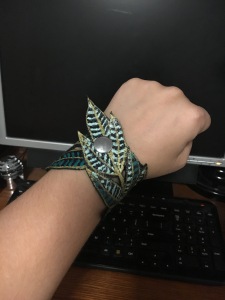
7. Finished! Just cut the extra hanging wire pieces around the edges. (I also added a “pearl,” but it is not necessary).

IMG_5083

9. Put it on any size necklace you wish (I used a chain from another necklace).

TIPS:

  1. Use about 9 inches for the 16 gauge wire-fin outline. This will create a 2 inch fin and give you some extra to mess around with for the top. The twists in the outline of the fin take some extra wire.
  2. Use a long-long-long-long piece of 26 gauge wire for stringing the beads, unless you want to keep cutting more wire and stringing it on as you go.
    • Although you need to string on new pieces when you get to the individual fin sides, having a long piece isn’t going to hurt you. If you have a long piece of extra, you can always use it later.
  3. As you can see from the picture, I did not take my time pressing down all of the side wires. If you want a cleaner piece, be sure to strongly pull the wire on the side.


PROJECT LEVEL:

Easy, and it came out beautiful! I had no problem with this project. The beads are always a little tricky to pick up, but nothing too terrible. Also, the 26 gauge wire was hard to see, so sometimes I wrapped it around the wrong thing, which made for immediate problems with immediate solutions. Again, nothing more than a slight inconvenience.

PRICE OVERALL:

Again, I had everything I needed for this project, so, for me, the price was free (you can’t beat that)! If you don’t have any of the materials, this will set you back about $20.00-$30.00 depending on where you go, but you should have enough supplies to make multiple necklaces.


This project came out so beautiful, I can’t wait to wear it around for the summer! Now I may live out my mermaid dreams in peace.

Happy twiddling~

Conversation Starter

Let us start a conversation:

talk

Having a BA in English, I learned the best way to improve your writing is to start with a prompt. Whether the prompt is combining random nouns into a short story, or starting with a first person viewpoint and changing to a third, you will never go wrong if you allow your imagination to start somewhere.

So let’s get started!

The webpage writingexercises.co.uk is a great site to find beginner writing prompts.

I decided to pick the prompt, “Random Dialogue Generator.” This prompt is set up to allow the writer to continue a line of given dialogue, and advance the conversation.

CLICK HERE TO JOIN ME IN THIS EXERCISE.

TWIDDLE TEST ~ DIALOGUE WRITING 

Let’s set a time limit to the writing for five minutes. Does everyone have their timers on? Don’t forget to generate your first line of dialogue.

I received the sentence, “Sorry, its just that I get very nervous when someone else is driving.”

READY? BEGIN!

“Sorry, it’s just that I get very nervous when someone else is driving.” 
This is something I never expected to hear from my driving instructor. 
“Umm. Well, what’s the next step?” I coughed out after stopping at the cross.
“Right, right.”
“Right?” I turned on my blinker.
“No. NO. Click that off. Yes. yes. Make sure there are no pedestrians crossing at the walk. That’s the most important. Most people forget this as they tend to focus on the road. I’ve even seen it happen with experienced drivers.”
“Like you?”
“Like me… like me?”
“No. Obviously not, right?”
“I’m afraid you should be starting on the break at this point. Really-break, break!”
“I am! I am! My gosh. Are you insane!?”
“You were going around 30mph you-“
“I was way before the line. It’s not even my first time driving. Why in the world-“
“Just pull in here. Yes, watch- turn the wheel. Lord. Stop. Stop. I need a smoke. Don’t move. I’ll be back in a minute.” 

AND TIME!

My five minutes are gone in a flash. Amazing how quickly the time escapes, isn’t it?

You may also try for ten minutes, or continue with your story if you like where the conversation was headed. Either way, this prompt is a good way to practice your dialogue and writing skills. It is also interesting to see where the imagination goes.

Another good way to practice dialogue-writing is to go into a crowded restaurant and ease-drop on genuine conversations. You will find that most conversations are very erratic and do not “flow” like a description.

FOR EXAMPLE:

How people think conversations are:
“I didn’t know we would be having fish.”
“Why not? I told you this morning we would have it.”
“I do remember that, but I told you I don’t like fish.”
“Yes, but I told you we would have fish. How many times must I tell you?”

How conversations actually are:
“We’re having fish?”
“Hum?”
“WE’RE HAVING FISH?!”
“Why do I need to cook every night for all of you who only complain about what I do and how I cook and what people like or don’t in this hot kitchen?”
“That’s not what I…”
“Great, great so you can cook and serve next time and I just won’t worry since whatever goes, great…”
“I didn’t. Whoa, just calm yourself.”

Sometimes conversations are strange!

Have fun with this and feel free to post your dialogues below if you test this writing exercise!
Happy twiddling~

Majora’s Mask Time Piece

This crafting treat comes to you from the popular video game Zelda, specifically Majora’s Mask.

(Top to Bottom: my clock, the clock from Zelda, Majora’s Mask, the clock from the Otaku Crafts)

IMG_5044clockclock2


DISCLAIMER: I DID NOT MAKE THIS DESIGN.


otaku crafts
I picked up this idea from Otaku Crafts.

It is a wonderful webpage with geeky crafting ideas galore. Please head that direction for further instructions on this project, as well as other easy to follow crafts.

“You’ve met with a terrible fate, haven’t you?”
majoras mask

In Majora’s Mask, you are the hero, Link, sent to stop the moon from falling in three days. In this game, you are constantly reminded of time, traveling from first, to second, to third day over and over, until you succeed. The clock is an essential piece through the game play and makes a wonderful gift for any fan of the game.

The webpage says they base their design off a 10 inch clock, but you may size it based off the template they provide.

PERSONAL EXPERIENCE: 
Personally, I used the 10 inch template, as I bought the wood clock and corresponding time attachment from Michael’s Craft Store. It was not exactly 10 inches (more like 11 inches or so), but it still worked out in the end.

The site also says to use a blending tortillion, as you are using pencil to race the design. If you use ink, I believe you may use a credit card to transfer the design to the wood, and it may be faster (I used the tortillion because I had some, but let me know if anyone tries the credit card method).

I used sharpies to color my design, except the white circles; those I painted with white acrylic. If you want a stronger, more prominent color, I would use acrylic paint. I recommend using the paint on the white circles and the blue side circles to make the design “pop.”

I did not use a sealer to coat the top (as it was a last minute gift idea). It has been about three months and the colors of the clock have stayed very well. Still, if you have time to wait a couple of days for the sharpie to fully dry, then you may use a Mod-podge sealer to keep the design perfect.

Inserting the clock mechanism was easy, as there is a guide with step-by-step instructions. The only problem here is my wooden clock was extremely thick. The back of the mechanism is sticking out extremely far, and there is a tilt when it hangs on your wall. My sister did not care about the tilt, so I left it as is. If you wish to fix this, you may need to sand down or cut out a piece in the back, so the mechanism will nest into a flatter surface.


Overall, this project was pretty easy considering I know nothing about clock mechanics.

If you know of any other clocks in movies or video games, you may easily re-create a version of it using this idea from Otaku Crafts.

Happy twiddling~


‘Beading’ Around the Bush

STORY TIME:
One day, in the magical land of niece-town, a little girl named Clara was strolling around her Aunt’s house. She wanted to become a princess, so she put on a fancy dress and shoes. She danced and sang, but soon realized her outfit was not glorious enough to be considered ‘true princess attire;’ it needed something sparkly. She crept upstairs, to her Aunts magical dresser, and decided to try on every bracelet within reach. However, each bracelet she placed slid off and fell to the floor. Upset, Clara put everything back in its proper place, as it was too small for her tiny wrists.

BUT- unbeknownst to Clara, the Aunt saw her sneak upstairs with her spying, mirrored eye-glasses. Looking at each bracelet in its proper place, the Aunt was not mad. She saw that the little girl was not only a princess in attire, but also in action. Without hesitation, the Aunt cut and threaded a special bracelet out of pink beads and glittery butterflies. When the niece saw the bracelet, she was in awe.  “It fits! It fits!” she exclaimed. She paused for a moment, and turned inquisitively toward the Aunt. “But how did you get it to fit my small wrists?” she asked. “Well my dear,” said the Aunt, “it just took a little stretch.”

What was my point?

Right!

Beading a stretch bracelet is something quick and, honestly speaking, relaxing… unless you drop your beads on the ground. Then it’s infuriating trying to find those tiny suckers in the carpet.

Okay, time to stop ‘beading’ around the bush… wow that was terrible... let’s get to it!

TWIDDLE TEST ~ STRETCH BRACELETS

IMG_4999

I made all of these myself

You will need:

  • Stretch Magic elastic
    *They come in all sizes, but 0.7mm will work for about any size bead. If you are working with larger beads, go for a 1mm elastic)
  • Beads (your choice)

That’s it! No joke!
(Told you it was simple).

Normally, I try to pick a theme when I am making stretch bracelets, as I always make multiple bracelets at a time. For example, you may go with a fire theme, making one bracelet brown seed beads, representing the wood of the fire; another red and orange beads, representing the fire, and perhaps a blue, representing the fires heart. Another idea is to make a character stretch bracelet. Use a character’s hair and clothing as inspiration for a unique design.

For this example, I decided to pick a design based off Baymax from Disney’s Big Hero 6.

baymax

  1. To start, figure out what size elastic you need. Normal to seed bead, use a 0.7mm elastic. If it is a larger bead, use the 1mm elastic.
  2. Pull the stretch material and wrap it loosely over your wrist. Leave 1 to 2 inches extra. “Why not measure your wrist exactly?” I’m glad you asked! My wrist is about 7.25 inches, but if I cut my stretch band to my wrist length, I would have no leeway to tie the stretch band together. I would only have enough elastic to put the beads on, realize I have to take them all off, and cry on the inside. Don’t do that- leave some room- your crafting thumbs will thank you.
  3. Line up your beads in the order you want to place them on your stretch bracelet. I use a ruler as I assemble my design so the beads won’t dance around, and I can see when I reach the 7.25 inch marker. Clever girl.
    *If you are using seed beads, you don’t need to pick what order you want them in because they are too similar to care. Just string these on until you get your desired length.
  4. Time to bead! String those jewels onto your stretch band. Tie off to complete the bracelet.

This slideshow requires JavaScript.

I tie my bracelets about three times to secure. You may also use glue on the knots you tied to further enforce the bracelet, but I don’t use glue and have never had a bracelet break on me(knock-on-wood). I have had a couple bands break during the tying process, as I pull incredibly tight to ensure maximum lock-age. Still, nothing another stretch band can’t fix.

PROJECT LEVEL:
These little bracelets are quick, and so simple. They are great gifts for friends, sisters, nieces, etc. Even kids can do this one! Although, I’d keep those tiny beads away from kids who can’t avoid eating everything in sight. #chokinghazard

PRICE OVERALL:
SUPER INEXPENSIVE! Cost will be of the Stretch Magic and beads you buy. Many craft stores have sales too.

Warning:
Once you start, it’s hard to stop, so try not to plan anything around your beading time:
Friends: Hey, let’s hang out!
Me: I CAN’T FIND THE BEAD! IT WENT ON THE FLOOR. NOOOOooo! I MUST FIND IT!
Friends: ………. we’ll hang out later.

Happy Twiddling~

Most DIY Projects

This is how most of my DIY projects start:

“Ooh. That’s pretty. It’s so amazing. Wow. Really, I love it… I could do that. It’s sort-of expensive. I could definitely do that. I’m doing that.”
– END

In actuality, it’s highly-probable-almost-indefinitely-certain-I-may-possibly spend more on the crafting than on the original item cost.
Capture

Nevertheless, this week’s version of the above conversation is a leather leaf cuff, inspired by Etsy.com artist, AshleyAnnBennett. Her items look beautiful, and I am excited to twiddle a re-creation of her breathtaking work.

I smell disaster, as I have no way of knowing what will work and what won’t, but here we go anyway!

TWIDDLE TEST ~ LEATHER LEAF CUFF

il_fullxfull.506542250_5c8t

ASHLEYANNBENNET on ETSY.COM


*I AM NOT A BEAUTIFUL PAINTER like Ashley, so if you would like the perfect-painted cuff and stronger leather, you should buy from her- she really does craft beautiful items.

You will need:

  • Soft leather (You need your wrist size from clasp to clasp AT LEAST. Wrist size depends, but is usually around 7 inch-7.5 inch. I would therefore shoot for a 10 or 10.5 inch long leaf)
  • Strong scissors
  • Metallic brass paint, and your choice of two colors for the leafs (I used matte teal and mint)
  • TINY paint brush
  • Scotch tape
  • Mod-podge* (check my “WHAT I DID WRONG” section at the bottom)
  • Sandpaper* (check my “WHAT I DID WRONG” section at the bottom)
  • Strong X-ACTO blade
  • Leather clasps/snaps
IMG_4952

Cut out a size guide on a piece of paper. Mine is 10.5 inches from tip to stem (7.5 inches from center clasp to opposite center clasp when finished).

IMG_4954

Scotch tape the paper to the leather and cut our your design. Use an X-ACTO knife to cut the small pieces in the middle.

IMG_4956

Outline your leafs with the metallic paint.

IMG_4957

Outline complete (you may need to go over this again as my green acrylic paint got on some of the lines in the next step).

IMG_4958

With your small brush, add your coloring. GO CRAZY. This is the fun part! You may want to touch up your gold lines if you “went outside the lines” a bit.

* I also used Mod-podge before the snap was added to give the leaf a glossy, protective coat. However, I think sanding before painting would work best.

IMG_4963

Add your snap clasp and admire your wrist (check below for instructions on the snap attachment).

IMG_4964

Lovely!

WHAT I DID WRONG:

  1. The leather I chose was very velvet-like in texture. I believe the paint would adhere better if I had sanded the top of where I wanted to paint. Sanding the leather may cut the mod-podge sealing step out of the craft all together.
  2. The brass metallic paint I used was too bold (in my opinion) and I should have picked a darker bronze tone to off-set the bright teal and mint colors. I also feel like the mint was TOO ‘minty’ and didn’t compliment the darker teal color.
  3. I did not have a tiny paint brush, so I decided to go ahead and paint with a large brush… STUPID! You NEED a small paint brush for the leaf grain details. My design would have been much cleaner had I done a brush swap.
  4. WHY IN THE WORLD DO SNAP LEATHER CLASPS NOT COME WITH AN INSTRUCTIONS PAGE!? >_< #pullingoutmyhair. It was not that easy for me to figure out based off the picture directions. I had to watch  few Youtube videos to figure it out myself, and I had to waste a clasp on a scrap piece of leather just to make sure I did it correctly on my main piece. For all who need further instruction, here is my attempt at an explanation:
    Clasp-snaps come with 4 pieces, and a base and steadier for hammering.
    IMG_4965IMG_4966
    The left two fit together and the right two fit together for the snap to work. IMG_4968
    Eyelet goes on top of the circle-hole pin (placed on bottom stem of leaf).
    IMG_4970
    Washer goes on top of the button pin (placed on top of the leaf).IMG_4971
    Alignment will be like this, but with a piece of leather in the middle. The leather should be punched (in other words, have a hole) for the pins to go through, and the washer to go on top. Once hole is punched, you align and hammer until they stick to the leather. I recommend a rubber hammer so the metal on your tool won’t bend, but any hammer will do.
    DO NOT HAMMER INSIDE. YOU NEED A HARD SURFACE, LIKE A WORKBENCH OR CONCRETE TO GET THIS TO WORK. 
    Here is the video for more details and correct terminology.

PROJECT LEVEL:
Easy-peasy, but time consuming. If you are going to attempt this project, I would definitely focus on the “what I did wrong” to save some valuable hours.

PRICE OVERALL:
Honestly, this only cost me $15.00, and I have enough material to make two of them (and a bazillion snap clasps), so that’s a double win!

I feel like I’m in The Lord of the Rings with this cuff, and ready to shoot my bow and arrow; I’m super happy with the outcome!
*I better be with that clasp torture

Anyway, best of luck to you all  with your crafting! Let me know if you try this one out.

Happy twiddling ~

Continue reading

Bohemian Feathers

Summer truly makes me feel easy-going. Kids playing, pool parties, holiday events, watermelon and pineapple. Summer!
pinapple

When it comes to summer style, I love the idea of simple and casual. Nothing too drastic, but something fun and easy-going. So what comes to mind?

Feathers definitely give the feeling of freedom, sky and relaxation. The bohemian look has been a popular trend, so to get everyone excited for summer, let’s try a bohemian DIY.


TWIDDLE TEST ~ FEATHER CLIPS or EARRINGS

You will need:

  • Feathers (of your choice and color, but I used THISALSO THIS)
  • Chain OR chord (of your choice and color, but I used THIS)
  • Chord end caps (HERE)
  • Jump rings (various sizes)
  • Wire cutters & jewelry pliers
  • Hair clips/bobby pins OR earring (dangle) backing
    • OPTIONAL: Large beads for decorating

I decided to go with some brown and white feathers because I’m boring…
… just kidding, I’m pretty awesome! But in all seriousness, I wanted a neutral, bohemian look, so the browns were perfect. Feel free to experiment with all types of feathers and colors; it will only add to your project. If you want a more neutral look, go with the warm undertones, like I did.

  1. Start by grabbing your chain and snipping it down to your longest desired length. I wanted a long hair feather, so I decided on 12 inches for the longest piece.
    IMG_4930
  2. Grab the feathers you want for the lowest level of your chain and group them together.
    IMG_4931
  3. Cramp the cord end cap onto the feathers to group them.
    IMG_4932
  4. Add your jump chain (any size, your choice) to the chord end cap and attach it to the bottom of the chain. We shall call the 12 inch chain with attached feathers ‘A.’
    *Option to add a bead to the chain or top of the feathers here*
    IMG_4934
  5. Cut another chain piece (3 inches approximately)
    IMG_4937
  6. Pick some feathers again and repeat steps 3 & 4.
  7. Attach these to the 3 inch chain. This is ‘B.’
    IMG_4938
  8. Grab some more feathers and crimp on the chord end cap. This is ‘C’
  9. To ‘C’, attach a large jump ring and place the ‘B’ chain through the jump ring as well. (‘C’ on top. ‘B’ on bottom).
    IMG_4939
  10. Attach the ‘C’ & ‘B’ combination to the ‘A’ chord wherever you wish to have them align and close the jump ring. You should now have your full length hair clip.
    IMG_4940
  11. Grab another large jump ring (the largest) and attach it to the top of your full length chain.
  12. Continue to attach the jump chain onto the center of the snap clip and close shut.
    IMG_4941

FINISHED! You now have a marvelous hair clip.
If you wish to do an earring, it is exactly the same, only with the earring backing. Just attach the chain to the earring dangle and twist the wiring to lock it in place.

IMG_4928

PROJECT LEVEL:
This is a harder project depending on the feathers you get, etc. Sometimes they slip out of the end caps if not properly pushed down. Also, the thickness at the top of my feathers was annoying and had to be cut once attached to the end caps. Still, I can’t hate this project. Feathers flowing through the hair feels super-fun.

PRICE OVERALL:
Again, I already had a lot of these materials, so the cost wasn’t a big deal.
BUT- if you need everything on the list, we’re talking around $20-25 for the project excluding the tools.

REMEMBER- this project makes a lot of clips!  Think about cost vs. amount.

PLUS, who doesn’t want to feel like this?

pocahontas1

Happy twiddling~

A Tip We Should Remember

I recall an outing at a restaurant some time last year. We had an easy-going meal, but the waitress whom was serving us seemed to be having a tough time. She was undeniably friendly, but tired and preoccupied. When the bill arrived at our table, we came to a realization that we had less money than anticipated. While friends were trying to figure out where we were short, I decided to twiddle a bit. I took another dollar from my wallet and folded it into a paper origami heart. Finally, all was settled with the bill and we left-

HOWEVER

I decided to leave the heart as an extra courtesy to our waitress. Not two minutes after walking outside the restaurant, the waitress came bolting out the door like a firework. She called out, holding up the money heart and beaming a huge smile. I could tell with just that simple thing, I had made her day a little brighter.

Since smiles are always worth the share, let’s begin our tutorial:

TWIDDLE TEST ~ MONEY HEART
Now, if you are new to money folding, you may want to start with a 6in by 2.5in dollar-shape rectangle.

Instructions:


DONE-DONE-DONE!

Congrats! Now you too may impress your waiter/waitress.

Although, I can’t promise they will not unfold it immediately! Still, isn’t that extra effort worth a smile?

Happy twiddling~

DIY Disney

Hello twiddlers.

We should all come to the realization that Disney owns the world as we know it. Still, who can say no to a Disney trip? It’s magical, beautiful and needless to say, fun.

Last month, I went with my sister on a special trip to the Anaheim Dental Convention…hooray… *cough cough*(sarcastically raises flag and waves in the air with little enthusiasm). Now, you may ask yourselves why in the bee-licking world would I put myself through such torture fun.

Obviously, the answer is Disney.

We planned our trip accordingly, until I realized I had no Disney “gear,” most importantly, a hat.

“Why don’t you buy a hat once you get to Disneyland?”
Well my fellow twiddler, I’ll tell you: At $24.00 (low-end price) I figured I would go broke shortly upon arrival. I decided it was time to bust out some low-end craft skills.

TWIDDLE TEST~ DISNEY HATS
e22a6dc3ffd7ed46a180b75478d7cdf0powerlinehat
Cakeworthy
is a great business that sells Disney inspired merchandise. I was going to buy a couple of hats, until I realized the one I wanted was sold out (and also $30.00). Time for a re-creation!

First, I picked the designs I wanted. I decided to go with the Cakeworthy inspired Powerline hat, from A Goofy Movie and Cheshire Cat hat, from Alice and Wonderland (seen above).

You will need:

  • Flat brim hat in desired color (I got mine from Ebay, HERE)
  • Fabric paint (color will depend on your desired style. I needed black, yellow, light pink, white)
  • Printed iron-on fabric transfer sheets
  • Painters tape
  • Iron
  • Hot glue gun
  • *Optional* (I do not recommend this, but if you are willing cover your bleeding fingers, or are an embroidery expert) embroidery floss & either heavy canvas or embroidery backing

I found most everything at Michael’s Crafts, but any craft store should do the trick. Once you have your idea and hat, it’s time for the real work.

  1. Start by printing out the design you need onto your iron-on fabric transfer sheet.
    If you are doing the Cheshire cat hat, you will need to print a smile for the bottom of the hat. If you are doing the powerline hat, you will need to print out the powerline logo, and, if you would like, the optional “world tour ’95” for the back of the hat.Other options include the mermaid hat where you would print out the word “Mermaid” or perhaps a Peter Pan hat where you would print out a feather for the side.
    lostboy_side_1024x1024tumblr_nqfa17C83i1qj9wxoo1_1280
    In order to get the dimensions correct for the Cheshire cat smile, and in order to save my iron-on sheets, I cropped an online picture of the cat’s smile, and printed it on regular paper until I had the correct size I needed for the hat. Better safe than sorry.

    Once the designs are printed, follow the iron-on guide to iron the logos to the hats and place the logo based on your design idea (front, side, under the brim, back)

    *If you are going to use embroidery to write or outline your design like I did, I applaud you. Grab your bandages and go at it. Once completed with your embroidered design, hot glue or sew (I prefer the hot glue, as the hat was too thick for me to thread through) the design onto the hat.

  2. Use painters tape to block out stripes around the Cheshire cat hat, or to block out the hair for the powerline under brim. Then paint based on the scheme of your design.
  3. Let the design dry for at least 24 hours before wearing out and THERE YOU HAVE IT! Some pretty cool Disney hats! Easy peasy. Although, my fingers are worse for wear for that embroidery.

    IMG_4071

    PROJECT LEVEL:
    Excluding the embroidery, I had a pretty easy time with this project. Getting the dimensions for the iron-on design was a little tough, but the painting was fun and the final result was rewarding.

    PRICE OVERALL: 

    I had a lot of the materials already such as a hot glue gun, painters tape, iron-on sheets, and fabric paint. All I really needed to buy was the hat and (unfortunately) embroidery backing. Therefore, personal project cost for one hat was around $11 but I assume if you do not have the paint, or iron-on, it may be more toward the $15.00 range.

    My sister and I received so many compliments and had a great time at Disney. It’s definitely a project worth trying.

    Please share your recreations in the comments if you decide to test this project.

    Happy twiddling~